Tonight I had a good friend of mine come to my classroom so that I could show her how to use my green screen. I never would have believed that I'd be teaching someone how to use a green screen along with so many other things that you could do with an iPad. I am so thankful that I have met some wonderful teachers in the past couple of years that could get me to where I am today with technology. Last year was my first year using a MAC. It scared me. Really scared me. But...now I love it! I also received an iPad 2 years ago because of a grant that I wrote and used it only for doing green screen videos. I only used it for my green screen. I had NO IDEA how much you could do with an iPad until last year. Last year I moved from first grade down to kindergarten. We each have 12 iPads in our room. The thought of teaching 5 years olds how to do anything on an iPad scared me because I didn't even know how to use one myself! How was I supposed to teach a 5 year old how to use an iPad??? Well, we have some wonderful Digital Learning Coaches (DLCs) in our district that are willing to come into our rooms any time we want to learn something or when we have an idea and they saved me! They help us along and teach us how to do new and exciting things. Because of them, my teaching has changed. I have also met some very knowledgeable people through blogs, and conferences that I have connected with. They are some of the sweetest people that I know and are so willing to help me whenever I need it. I am thankful and beyond lucky to have all of them in my life. The world is changing and I need to be able to keep up with technology and teach my kids skills that they are going to use in their life. Theirs will be so different than mine was and I was to push them and challenge them so that they are keeping up with the times. I want them to have opportunities to learn and grow and I can only do that if I am growing with them. Tonight I was able to teach someone else what I have learned. I had so much I wanted to share with her. It's crazy to think that I didn't KNOW last year what I know now. I am thankful for those people who have encouraged me and who have been by my side answering all my questions....sometimes over and over again.
Tonight I taught my friend how to make a green screen video. We talked about so many different possibilities. She is going to start with Readers Theater...which is a great place to start. I just started using the Do Ink Green Screen app, so there may be easier ways to do things than what I showed her tonight. I am going to put down all the steps of what we talked about so that she can remember them and so that you can try out the steps if you want to.
The first thing we did was open the camera app to take a picture of the background that we wanted for our project.
She is doing a Reader's Theater play on The Little Red Hen, so we took a picture of the cover of the book. This will be the background of her play. She could also have the kids draw a picture of a farm, or make a picture out of construction paper and use that. All you'd need to do is take a picture of the background.
We centered our iPad and took a picture of the book.
We then hit the edit button and cropped the picture to the size that we wanted it to be.
We got rid of all the extra stuff in the background.
She used the lines to frame her book and to make it straight.
When she was happy with what she had, she clicked done.
We then opened the Do Ink Green Screen app.
She clicked on the + sign to add a new project.
She clicked on Create a New Project.
When the screen came up we saw + signs on the bottom. We clicked the + sign that was on the second to the bottom. Being I am so new to this, I am not sure what the bottom one does yet.
She then clicked on the image button. This will allow her to find the photo that she wants to use as her background.
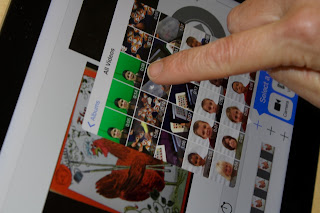
It brought us to her camera roll.
She clicked on All Photos.
She then found the picture of her background.
She selected the picture of the book.
She clicked on the USE button.
When the picture came up, we were able to decide how big we wanted the picture in the background and where we wanted it. She decided that she wanted it to the right. She would sit off to the left of the picture when she was talking.
This is where she positioned it to.
We then got out of the app.
We went back to our camera app.
We moved the buttons so that VIDEO was highlighted.
She sat behind the camera and I positioned her so that when she was sitting she was a little bit on the left.
I then hit the record button and she started talking. I told her that when I hit the record button, I always have some kind of signal that I use with my kids so that they know when to start talking. I hold my hand in the air and when it is time to record, I drop my hand. They know that they can start talking.
She then talked about her book. She talked about the title of the book here.
I then hit the square button to stop recording.
We repeated this process 3 times, making 3 different videos.
When we were done with the videos, we went back to the Home Screen.
We selected the Do Ink Green Screen App again.
She clicked on the top + sign.
This time she selected her Video that she wanted.
She was taken to the All Videos button.
She selected the first clip that she recorded talking about her book.
The video came up. She was able to view it.
She selected Use.
She then moved it to the left side of the line.
She pressed the plus sign and selected video again.
She was brought back to All Videos.
She found the second clip of her video that she wanted to use. When making the video, she could have just done one long clip. I always make several smaller clips. This allows me to change the backgrounds if I want. It also allows room for mistakes. If you make lots of mistakes, you only have to redo one little clip instead of the whole video,
She viewed the second clip and then selected Use.
This was added to the right of her first clip. She moved the enter clip over to the left of the line.
She repeated the steps again so that she could add her 3rd video. When I am adding different clips in my videos, it's usually of different kids talking. She selected the + sign again.
She was brought back the the All Videos option.
She clicked on it.
She found the clip that she wanted and selected it.
She viewed it and then selected Use.
She added it to the right of the other two clips. She then moved the whole clip over so that she was at the beginning of all three clips.
She selected the triangle to play her video.
You will notice that you now see the book in the background and the green screen is gone.
When she was done, she clicked save.
There was a message on the bottom that said the video was processing.
The word Done popped up and she selected that.
She saved her video to the camera roll.
You'll have options as to how you want to save it. She selected Medium...you can pick what you want.
A message came up that said that the video was saved to the camera roll.
We clicked Done.
We then went to the Drive app.
We clicked on the red + sign near the bottom on the right side.
We selected the up arrow to upload our video.
She selected Photos and Videos.
It brought us to the Camera Roll.
She found her complete video.
She clicked on the green check mark.
A message came up saying that it was uploading.
We clicked on the 6 little boxes that came up in the upper right hand corner.
We found her video.
She then selected rename.
And she typed a title for her video.
When she was done, she clicked the DONE button. She then clicked the 3 little buttons in the top right corner.
She selected add people.
She entered the email address of who she wanted to share the video with.
When the addresses were added of who she wanted to share the video with, she selected the check mark.
Her video was now shared with whoever she wanted to share it with. Typically this is parents or coworkers.
You can view a little clip of what we made.
Little Red Hen Book Preview
I also add my videos to my Seesaw folders so that kids have it for their viewing and for their parents to view.
Enjoy!


I love your tutorials!! Thanks!
ReplyDeleteThank you!! My kids LOVE our green screen. I hope this is helpful to everyone. :)
Delete