About Me Freebies Home Image Map
Showing posts with label Seesaw App; ipads. Show all posts

Wednesday, November 4, 2015

Assessing Students with Seesaw

I can't believe we are nearing the end of our first quarter!  This means that report card day is coming up and we need to have all of our assessments done.  Anyone that teaches kindergarten or first grade knows how time consuming it is to do assessments with 5 and 6 year old kids.  You have to have your WHOLE class independently, quietly working.  HA!!!  It takes days to get all kids done because each assessment seems to take at least 10 minutes.  Do the math.  21 kids X 10 minutes equals 210 minutes to do ONE assessment.  We have TONS to do.  It takes forever.  

After talking with Mrs. Gadtke on Twitter one night, I learned some tips.  I am NOT stressing anymore.  She is my HERO...and I owe her big time.  She shared with me the draw and record tips on Seesaw.  I tried it out the next day and wanted to cry tears of joy!  This is what I learned.

First of all, I took pictures of all the assessments that I had to have my kids do with me.  Counting cubes, identifying numbers, reading sight words, writing numbers, identifying shapes, etc.  I made a packet of everything I wanted my kids to do.  I then called 12 kids over to me.  (I have 12 iPads in my room).   I sat them far apart from each other so they weren't hearing each other.  I also had the pages in my packets stapled in different orders so they were all doing different assessments at different times.


I had each kid open the Seesaw app.

I had them touch the photo button.

They then took a picture of the assessment that I wanted them to do.   They did this by touching the green camera button.

They had to hold still while the iPad was capturing the picture.


They then touched the pencil under the picture.  I had them write their name on their picture.  This is really important to do.  On my first attempt at doing assessments with them, I did not have them write their name.  I had them do the assessment and then upload it to their folder.  I was about to approve all the assessments after they uploaded them to their folder but thought about it and quickly changed my mind.  I didn't want copies of my assessments going home to my kids & parents because I didn't want my kids practicing the same assessment at home until they got all the numbers right.  I thought that if I went to test them again, they might only know those numbers and get those all right, which would give them 100%.  They still might not know all the other numbers, but they passed the assessment because they knew EXACTLY what was on the test. I am all for telling my parents what kids need to know...but I don't want to have them only study 20 numbers out of 100.  So, I redid the test with my kids.  This time I had them write their names on the assessment and then upload it to MY folder so that I could go back and check it and I could record what they got.  I hope that makes sense...


Once they wrote their name, they hit the record button under the picture.  It counted down from 3.


I then had my kids touch each number with their finger.  When they counted the cubes, they touched the cubes and counted out loud.  When identifying the numbers below, I had them circle them as they were saying them out loud.

They circled the numbers as they said them.


Once they got done with this, they hit the green check mark in the upper right hand corner of the screen.  This stopped the recording.

The screen then said UPLOADING Video. (My screen looks so weird here.)

A little triangle/play button came on.


The kids then hit the check mark in the upper right hand corner.

They selected MY folder.

They checked the green check mark.

I have folders set up on my iPad, so I had the kids using my iPad touch the math folder.  Their iPads are not set up like this yet so they were able to skip that step.


It said preparing item.

And then it was uploaded into MY folder.

I had them repeat these steps for 8 different assessments.  Guess what?!  They did it!!!  It was so easy for them!!!  I am now able to look through my folder and see all their videos.  When I play back the video, it shows the pencil drawing the circles or putting a dot on whatever they are touching.  Their voice matches the marks they are making so you can see them circling a number as they are saying it. I can see who has one to one correspondence down.  I can see who knows their numbers.  I can see who gets numbers reversed...(12, 21), etc.  I don't have to write any notes down because the video recorded their voice and movements.

Hopefully  can see the links below.  This was of me counting apples.  You can see that when I am counting, my marks show up and they match my voice.

Here is another one of me counting cubes.  I tell them what they need to do at the end...

The best part is I can view them AT HOME or during my prep and record their score on my recording sheets.  To do 9 assessments, it took 21 kids 1 hour and 20 minutes.  If I would have sat one on one with EACH kid to do ALL these assessments, it would have taken a week.  During this time, they would be doing centers, but they wouldn't be learning anything new because I didn't have time to do whole group teaching or direct instruction.  I am now able to have 2 groups of 12 kids sit for about 30 minutes or so and get all the assessments done.  30 minutes sounds like a long time, but not one kid was ever off task.  They went through their packet and got down while the rest of the kids were working.

I am so excited that we can do this.  When I assess kids for 2nd quarter, I will start earlier and only do one assessment a day.  Because I just learned about this, I had to get them all in.   They did well, but starting earlier will take only about 5 minutes of time during the day.  Once again, Seesaw has changed my teaching!  I am so excited that Mrs. Gadtke shared this with me.   I hope you can try it out and find it useful.

Have a great day!
Sara


Friday, April 10, 2015

Making Math Books Using Book Creator and Sharing in Seesaw

If you would have told me 6 months ago that my 5, 6 and 7 year old kindergarten kids would be using iPads to create books and upload them to a folder so their parents could see them, I would have NEVER believed you!  Following 2-3 step directions seemed like the biggest challenge for some of my kids!  We practiced sitting still, raising our hands (without blurting out answers to questions) and we practiced lining up.  We practiced so many basic skills of being in kindergarten.  I was proud of the littlest accomplishments!  

Fast forward 6 months, and I can tell you how much prouder I am of my kids.  Sometimes I have to sit back and smile and watch my kids as they are working. 6 months ago I would have NEVER believed they could follow 45+ steps to create a book on an iPad and share it with their parents!  But they can!!  They love it and I love watching them in action.

We use our iPads all the time.  So much that I had to come up with a new way of organizing them and keeping them easily accessible to my kids because they want to use them so much.  We have these wonderful carts that we can store our iPads in, plug them in and charge them.  Up until last week, I would take the iPads out of the cart and then have the kids keep stacking them on the table when they were done using them.  It was hard to find the correct iPad the next time they needed them and I was afraid that they would get knocked down.

Our cart....


These dish racks from Ikea solved all my problems.  We have 12 iPads in our room so 2 dish racks were enough to fit all my iPads.  I put them in the front of my classroom, right under our Smart Board.  I have a couple helpers take the iPads out in the morning and a couple helpers put them back at the end of the day.  It's worked so well.  I wish I would have thought of this a long time ago.
   

We have been using our iPads a lot during math time.  This week we made math fact books with some math fact houses that I had hidden around my room.  The kids used Book Creator to make the books and then uploaded them to their Seesaw folder.  


One of our lovely Digital Learning Coaches was so helpful in my classroom two days this week.  She worked with my kids and helped us learn how to upload our books to our Seesaw folder.  We are all so grateful for her.

I posted on my Instagram account some pictures of my kids in action and said that my kids had so much fun creating math books in Book Creator.  I had a follower ask how we used Book Creator in our math class, so I decided to post the steps here.

The first thing I did was create a new book in Book Creator, so that my kids had a template to use.  I pushed it out to all my kids iPads through Google Drive, so that it was there for them when we did this project.  I didn't take pictures of that step, but can, if anyone is interested in knowing how to do that.

Everything I do on my iPad, I do on my Smart Board so that my kids can see the steps.  It only took about 2 times times showing the kids how to do these steps together, before they were able to make a whole book independently.  Every once in awhile, we have to regroup and practice or do a step together, but for the most part they are completely independent.

Right now I am going to go through the steps of making our TIME books.

1.  We opened our Book Creator App.

2.  We found the Time book that I pushed out to all their iPads.

3.  We clicked on the book and it opened up like this. We clicked on the arrow on the right side of the page to bring us to the next page in the book.

4.  We saw a blank page with two lines that I already had on the bottom.

5.  The kids pressed on the + button on the top of the screen.

6.  This screen came up.  The kids pressed the Camera button.

7.  They then took a picture of one of the flowers that I had hidden around the classroom.  Each flower had a clock on it.

8.  On the bottom of the screen, they clicked on the Use Photo (if they liked it).

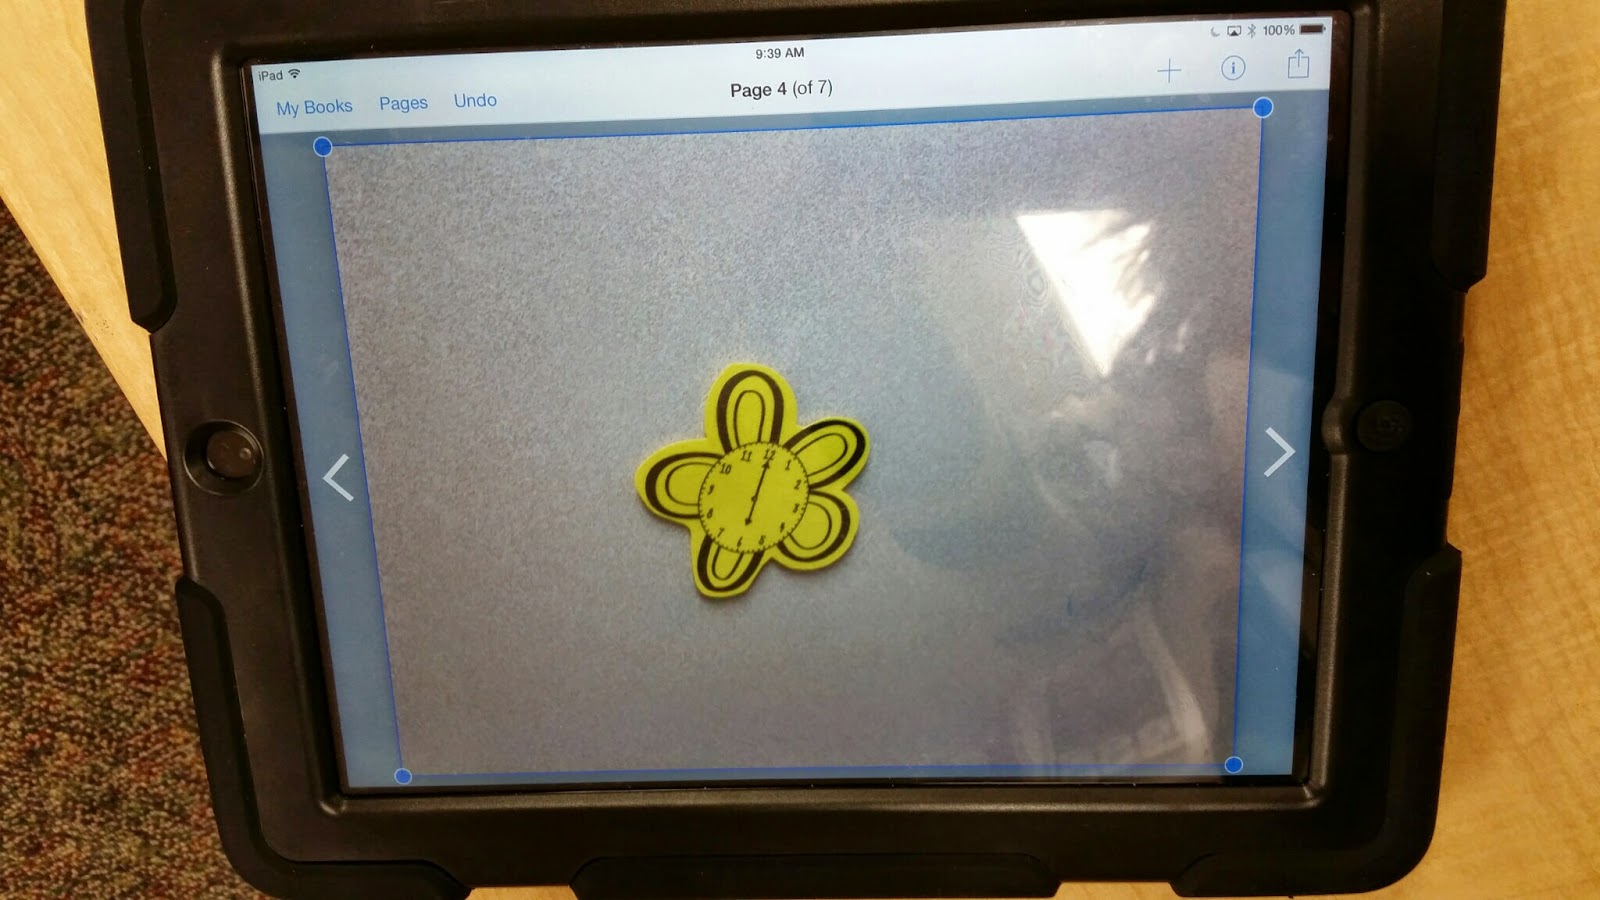
9.   They then saw their picture across the entire page.


10.  In the corners of the picture, they saw blue circles.  They grabbed these and made the picture smaller.

11.  They were then able to center the picture and see the lines on the bottom of the page.

12.  They then pressed the + button on the top of the screen.

13.  They chose the pen option,  

14.  They wrote the time above the lines.

15.  They then clicked the done button on the top of the screen,

16.  Now they had the picture of their clock with the time that they wrote.

17.  Now they clicked the + sign again.

18.  They selected Add Sound.

19.  When they saw the circle they pressed it to start recording.


20.  When they saw the red square, they said the time that they had written.  When they were done, they pressed the square to stop recording.

21.  They saw a little speaker sign.

22.  They selected YES for wanting to keep their recording.

23.  They were then able to move the speaker sign to where they wanted it.

24.  When they were done, they clicked on the > sign to move to a new page.

25.  They repeated the steps above to add a new picture, writing and sound.

26.  When they were completely done with their book, they pressed the My Books button,

27.  All of their books came up.

28.  Underneath the book, they pressed the i button in the middle.

29.  They clicked in the title box and typed the title of the book.  They then clicked in the Author box and typed their names.  We learned the hard way that if you click the Delete Book button, all your hard work is gone.  It is really important to stress NOT to do this.

30.  After they are done typing their names they click Done on the keyboard.

31.  All of their books will come back.

32.  Under the time book, they clicked on the square with the arrow.

33.  They selected the EXPORT AS A VIDEO option.

34.  They then clicked SAVE VIDEO option.

35.  This screen came up.  They had to practice patience here and wait until it was done loading.

36.  Once their book was done loading, they pressed their home button and got back to the main screen.  They then selected the Seesaw app.

37.  They saw all their choices and selected the camera roll button.


38.  A little box came up that said camera roll.  They pressed this,

39.  The last picture in the camera roll was their time book with a little video camera on it.  The clicked on this picture.

40.  Their time book came up.  In the corner they saw a green check mark.

41.  They clicked on the green check mark.

42.  Our class list of names came up.  They selected their name.

43.  They clicked the green arrow in the corner.

44.  They got a message saying their book was uploading.  This step took a couple minutes to upload.

45.  Our book was finally uploaded to our Seesaw folder.  Parents were able to view them.

I am now able to go through each kids folder and assess whether they got the concept of time or not.  I will be able to tell if I need to reteach them by looking at their books.

I have to throw these pictures in.  As my kids were working today, we looked out the window and saw the biggest snowflakes ever!  We could have stopped and made a book about snow falling on April 10th!  It was crazy!


I hope this post helps you so that you can create your own books and share them on Seesaw.  Have a great weekend!
Sara